Tuesday, November 30, 2010

Mom...is that you???

Yay!  It's not just my mom who reads these posts!  I woke up this morning to an email from a blog reader sharing HER holiday tablescape.  I'm so excited that I wanted to share it with you.  Here is what Danielle said:  

I saw your post about your table and you had asked what others did...not sure if that was rhetorical :) but I thought I would share my dining room centerpiece for Thanksgiving and one of my Christmas centerpieces. I only share because I am so cheap and make a lot of my own stuff. The Thanksgiving centerpiece was super easy and cheap. I found the candelabra at Kirklands for $10 (tossed back on the clearance rack and a little bruised)... didn't like the way it looked completely so I went and bought the candles I liked and the fake floral from garden ridge. Total price $30! Same with the Christmas centerpiece...didn't like it completely so I added my own stuff I found cheap! THe only thing the wreath had on it originally was the poinsettia flowers and the pine cones. I love decorating on the cheap!!!!!!!!


Danielle, you made my day!  Thanks for sending me the email with these photos of your lovely creations.  You continue to prove that with a little creativity, beautiful decor does not have to be expensive.

...AND you also proved that more than just my mom reads my little ol' blog because I hope that someday this blog is going to grow up and be like Cote de Texas.  WOO HOO!


Monday, November 29, 2010

Gobble Till Ya Wobble!

Whew!  What a holiday whirlwind we had!  Turkey.  Family.  Pie.  More Turkey.  More family.  Yes, please to more pie too....

We didn't host Thanksgiving this year (thank you to my sister in law who did!) but we did have Sunday brunch at our place.  If you saw THIS post last week with ideas for centerpieces, I had a couple that I wanted to do, but in between baking 4 pies, a pumpkin cheesecake, holiday dressing and then brunch for more than a dozen people, time was hard to find.  So we pushed together two tables, grabbed a few candlesticks from from my staging inventory (a definite bonus to my job!) and took the decorative gourds I bought around Halloween and tried to make them look pretty:


Not bad, eh?  The rest of the foofie stuff is random potpourri (so old it doesn't smell anymore), jeweled fruit, a gold ribbon and a couple of decorative gold spheres (also from my staging inventory).

As for the rest of the table, it was looooow maintenance.  I tied the napkins with pieces of a ribbon I think was tied around a Pottery Barn gift I received last year (because I couldn't find my raffia) and stuck them all in a silverware caddy with the silverware for everybody to grab on their own after filling their plates.  


What did you do for your holiday table???


Monday, November 22, 2010

Autumn Decorating Made Easy


Look What the Cat Dog Dragged In

Admittedly, my little dog needs to go to the "spa" and get a good groom this week, he IS a little furry:

Snoozing peacefully.

Look at what came in with him this morning when he went outside and ran around our back yard:
Leaves - a LOT of them!  And a stick (?!).

A closer look.
Seriously...how could such a little critter (he's only 5 pounds) drag in such a MESS?  I picked these all up off the floor and out of his fur when he came in.  And since I was running late, I looked for the closest thing to put them in so I didn't come home to a mess.

A glass vase I had yet to put away was conveniently on the kitchen counter.
Sometimes procrastination comes in handy.  This glass vase I my husband (let's give credit where credit is due) had just taken out of the dishwasher last night was still sitting on the counter and looked like a convenient receptacle for the excess foliage.  I thought it looked kind of pretty so the biger leaves I had brought in from our front yard to put it on a plate with my gourds & candles came in handy to top off this super easy autumn "decor".


So is it high design?  Absolutely not...but it was an easy way to bring some autumn color into the corner of our kitchen while cleaning up the mess the dog dragged in AND also saving me from having to put away the vase....  Efficiently lazy?  Yep.  But I was running late.


Thursday, November 18, 2010

Easy Thanksgiving Centerpiece Ideas

When I was a little girl...a looooong time ago...we would make fun decorations for our centerpieces during the holidays.  Now that I look back, I think Mom was just trying to save some money and take advantage of the attention it took for my favorite brother and I to craft these works of art.  I'm not sure if Mom saved any of them but if so, they are probably not nearly as cute as these ideas:

Martha Stewart
This is cuter than mine was, I'm sure, but we tried something similar with the pinecone and pipe cleaner.  I think I used leaves from the trees in our front yard, but these feathers are super cute.  Hobby Lobby usually has a great selection of feathers and they would adhere easily with Elmer's or hot glue.  I might give this a try next week if my schedule has the time in between client appointments, cooking, and getting the house ready for company!

Ooooh...now this I am absolutely going to do.  I have some fabulous candlesticks in my staging inventory right now that could really show off some pretty gourds:

Better Homes & Gardens

And if I get really crazy, I'll spray paint them metallic:

Better Homes & Gardens
I'll try to remember to take photos and post them here.  I get a little A-D-D during this time of year and forget to mix business with pleasure!  Would somebody remind me???  


Seriously though, what do YOU like to do for your Thanksgiving centerpiece???

Monday, November 15, 2010

Christmas Tree -- Decorating With Ribbon

I love decorating my Christmas tree with ribbon rather than garland; in my humble opinion, it is dressier and more elegant than garland.  I have strung my ribbon both horizontally, like a spiral as well as vertically, like a waterfall:
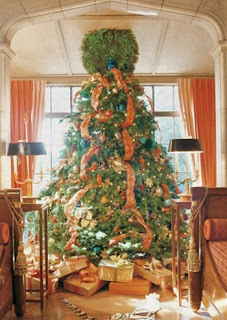

(Yes, that is a peacock topper, but we'll discuss those in another post.)

 
There are varying opinions as to whether you ribbon the tree at the beginning or the end of the process of decorating, so I'll share with you that I decorate with ribbon just after I light the tree but there are many advocates of adding the ribbon last.  I'm not here to say they are wrong, it's just not how I do it.   Regardless of at what point in the process you do it, the key to hanging good ribbon garland is that the ribbon should be wired. 

So here is a quick list of "how to" hang your ribbon on your tree, regardless of whether you're taking it vertically or horizontally:

  • Consider ribbon size -- larger trees get wider ribbon, smaller trees get narrower ribbon.  
  • Confirm the color will match the decorations you already have or are purchasing.  There are many many (many)options and you want to keep the decor of the tree consistent throughout itself as well as the rest of the ribbon you may have in the house.  It doesn't have to be "matchy matchy" but it does need to be similar in style.
    • Bright red or burgundy?  Plaid or plain?  Silver or gold?  Velvet or organza?
  • You'll need to purchase more than you think necessary and I have not come up with a magic formula as to how much you'll need.  It may be inconvenient, but purchase extra spools knowing that you can either take it back or use it to wrap your gifts with.  
    1. If you're taking the garland vertical, you'll need to account for at least 5 - 7 waterfalls of ribbon and you're not just going to let them hang, you need excess so you can wrap and twist and "pouf" the ribbon.
    2. If you are taking the garland horizontal, remember the tree is fatter at the bottom than it is at the top and again, you'll have to account for wrapping, twisting & "pouf-ing" the ribbon.
  • Once you have decided on color, width and direction of the ribbon as garland, it's time to start attaching it to the tree.  Don't laugh but I put chairs all the way around my tree so I can walk around the tree adding the ribbon if I'm going horizontal.  (It's easier than asking the hubs to stand there with the ribbon while I run around the tree!)  In either instance, I start at the top.
    1. Find an inconspicuous spot to start and wrap the end of the ribbon around a branch -- just the tip of the ribbon, maybe an inch or two of a wrap that can be hidden by the topper.
    2. Swag the ribbon either horizontally or vertically, and consider giving it a gentle twist.
    3. Wrap it around a branch with alternating a small & large "pouf".  You can also create a bow out of excess ribbon and put on the edge of the branch if you don't like your "pouf".  

Remember that you are going to follow the ribbon with your decorations, so don't get caught up in the perfection of your twists & poufs...you can always mask the imperfections with bows & bulbs.  

Most importantly: have fun!!!



Monday, November 8, 2010

3707 Gilbert Ave #11...Staged by Michelle Lynne

WHY BUY THIS HOUSE

Why?  Because it's gorgeous.  Because it's priced highly competitively.  Because it's in a fabulous neighborhood.  Okay, so yes, this is a total plug for a home we staged recently.  Why don't I gush over every house we stage? Well, I kind of do...but in this instance, the Realtor, James Sharp, who also just wrote a book on the real estate industry here in Dallas had this video created to showcase the property and I think it's super cool (yes, I am easily entertained).  It's way better than the usual "virtual tour" you will sometimes see on a listing...and let me tell you, even though this video shows the property really well, it is even better in person.  I think it's because the people who live there now are so nice.

Check it out:


HERE is the listing in case you want more information.


Thursday, November 4, 2010

Home Staging Tips by Michelle Lynne

BABY IT'S COOL OUTSIDE....


One of my all time favorite holiday songs is Dean Martin's "Baby It's Cold Outside" and this afternoon when I went by one of our (vacant) staged homes, I started singing it even though it isn't quite COLD here in Dallas yet.

Why was I singing it? you ask.  Well, since you asked I'll tell you.  I walked into the house to look around and ensure everything was in place and as soon as I entered, I was COLD.  Colder than I was when I was outside.  I walked over to the thermostat and it was on 52 degrees.  BRRRRR!


Being the practical and frugal person I am, I understand keeping the thermostat down and not spending extra money on heating a house that I don't live in.  BUT if you have a home on the market remember that you're not just selling the house, you're selling the feeling or emotion that the house evokes in the potential buyer.   

What do you want the buyers to remember about the place?  That they would have to invest in a Snuggie in order to sit in the living room or that it was  such a warm & welcoming home that they would love to live there....


You don't have to heat the place to a cozy 75 degrees, but I do suggest at least 65 degrees or more!


Tuesday, November 2, 2010

Giveaway by Michelle Lynne

SLEEPY EYED SELECTION

Good morning and congratulations to JENNIFER TELLER for winning our $35 shopping certificate to any one of the 200+ CSN Stores!  

My husband woke up and sleepily wandered into the kitchen earlier this morning when I asked him to choose a slip of paper from a bowl where I had previously written out all of my followers individually (this is an easy task when you're still a little blog).  He went back to bed having no idea how he has brightened Jennifer's day!

Congratulations, Jennifer, and thank you ALL for publicly following my little bit of social media.  I will be posting holiday preparation tips and ideas next...and please don't ever hesitate to send me a note if there is any topic you'd like to see.  

Sincerely,
Your home staging & redesign consultant 
Michelle Lynne

Your home is where our heart is.